THE TYPES OF STIHL LEAF BLOWERS FOR VARIOUS NEEDS

Stihl is one of the largest manufacturers of leaf blowers worldwide. In 1989, the company produced its first backpack blower which is the BR 320/400 in its manufacturing facility at Virginia Beach in the United States. This equipment was followed by the BG 72 model and the BR 320L model backpack blowers in 1992. Just like the other power tools made by the company, Stihl leaf blowers are known for their durability and environment-friendly features.

Stihl leaf blowers enable you to tackle any cleaning job such as cleaning up a huge mess of leaves on your front yard at autumn or blowing away dust from outdoor structures with less time and cost. Described below are the types of Stihl leaf blowers designed for your specific needs.

Handheld Stihl Leaf Blowers

Handheld Stihl Leaf BlowersStihl leaf blowers of the handheld type are used to perform light tasks such as blowing away debris from driveways, grass clippings from walkways, and removing leaves from yards. They are either powered by electricity or gasoline. Their main advantages are their portability and multi-role functions. Some handheld Stihl leaf blowers are even equipped with accessories that convert them into vacuum cleaners or leaf shredders.

Electric-powered Stihl Leaf Blowers

Electric-powered Stihl Leaf BlowersThese handheld power tools are typically used for blowing dust, leaves, or light debris in a small area. They do not have exhaust fumes since they are powered by electricity. Thus, these Stihl leaf blowers are ideal for indoor cleaning such as in homes, gymnasiums, or offices. They are quieter to operate compared to their gasoline-powered counterparts. Stihl leaf blowers that are powered by electricity are the lightest ones. Just make sure that there is an alternating current (AC) outlet nearby where you will plug the machine.

The Stihl BGE61 Electric Handheld Leaf Blower is run by a powerful 120 V motor that produces an air velocity capacity of 148 mph. Its average air volume capacity is 394 CFM. Hence, it can remove debris in no time at all. It is light, weighing only 6.8 pounds. Upon operation, this Stihl leaf blower is relatively quiet since its motor produces sound recorded at only 64 decibels. This powerful machine has a gutter cleaning kit which is designed to remove clogged debris in roof gutters. In addition, this Stihl leaf blower also has a low and high-speed option that allows you to do various tasks.

Read more >> best leaf vacuum mulcher reviews

Gasoline-powered Handheld Stihl Leaf Blowers

These tools are typically used for larger areas they have no wires. These Stihl leaf blowers are designed with more engine power and operator autonomy in mind. They are relatively heavier than their electric-powered counterparts.

The Stihl BG86C-E Handheld Leaf Blower is one of the most efficient products of its class in terms of fuel consumption. It also has the lowest exhaust emissions among the product line of Stihl leaf blowers. This blower is powered by a 27.2 cc gasoline engine that produces a maximum air velocity up to 190 mph and has a maximum air volume of 459 CFM. It emits a sound level of 70 decibels. By installing special accessories, this blower can also be converted into a vacuum cleaner. In providing comfort for its operator, this Stihl leaf blower has a four-spring anti-vibration system and easy engine start-up function.

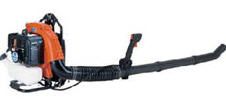
Stihl Backpack Leaf Blowers

These power tools are more powerful than their handheld counterparts. Thus, they are ideal for tackling jobs in even more wider areas. A backpack model of a Stihl leaf blower is attached to shoulder straps so that the operator carries the machine in a backpack position.

Trimmer Trap ST-2 BR 500/600 Series Blower Rack

Trimmer Trap ST-2 BR 500/600 Series Blower RackThe Stihl BR600 Magnum is the best example of this power tool. The said Stihl leaf blower has a gasoline-fueled engine that has a displacement of 64.8 cc. Having a maximum air volume of 712 CFM and a maximum air velocity capacity of 201 mph, it can blow away thick dust and debris. It is lightweight at 21.6 pounds and is comfortable to carry because it has a high-quality nylon harness. Made with low-vibration components, it is also equipped with a three-position blower tube for various purposes. The fuel tank of this powerful Stihl leaf blower has a capacity of 47.3 oz of gasoline, ensuring that your job can be finished without constant refueling.

Always bear in mind that there are three factors that determine the power of Stihl leaf blowers. These are the maximum air velocity measured by miles per hour (mph), the engine displacement which is measured by cubic centimeters (cc for brevity), and the maximum air volume measured by cubic feet per minute (CFM). The greater these capacities, the more powerful these machines are. Whatever your needs are, there is always a Stihl leaf blower for you.


Brussels Sprouts, The Belgium Version of Cabbage

Brussels Sprouts, The Belgium Version of CabbageThis relative of kale and cabbage hails from the city, Brussels in the country of Belgium. The Belgians have been growing Brussels sprouts since the 1200s. Though the green variety is what is most familiar on the dinner table, like cabbage, there is a red variety of sprouts as well. Light frost and colder weather enhances this crop and makes it perfect for a fall crop in warmer climates.

The sprout is actually a bud to the plant that will produce a flower. Warm weather and long days will open these buds and then the sprouts are not suitable for eating because they become bitter.

Planting

Brussels Sprouts are annuals and need to be replanted each year. The plants grow to be about twelve inches high, producing multiple “sprouts” for harvesting. Seeds are started indoors and the small plants placed outside when any chance of hard frost has passed in your growing zone. Warmer climates will want to do a fall planting; the cooler climates are usually safe to plant around the end of March or start of April, after the roughest cold weather has passed. Direct seeding is a good way to start this crop, but as mentioned before, you can seed in trays and be ready for the first spring warm up. This will ensure plenty of growing times to give you a harvest in approximately three months from the time transplants are placed in the ground. Direct seeding will result in a harvest about two to three weeks later than the transplants.

Full sun or partial shade is the area Brussels sprouts will be happiest in. This crop likes a sweet or slightly alkaline spoil of a pH level of at least 6.5. Organic matter is added to help keep the moisture these plants need for their rapid growth and production periods.

Transplanting
When transplanting Brussels sprouts, the soil should be firm, but not compacted around the stem of the plant. Spacing the plants about two to three feet apart give them plenty of room to spread out as they grow. Direct seeding should be done in one quarter to one half inch of soil, being sure to keep the soil moist.

Unfortunately, Brussels sprouts have many of the same problems as cabbage and broccoli when it comes to common insect pests. Controlling these pests is best done with a mild soapy insecticide approximately once a week and by placing diatomaceous earth around the base of the plants. This is very effective against root cutter and slugs! Diseases can be controlled quite easily by rotating the crop each year.
An extra Tip: While the Brussels sprouts are small you can plant a short season crop in amongst the rows. Bush peas, beans and radishes are excellent choices. The peas and beans add nitrogen to the soil.

THE RIGHT BACKPACK BLOWER

There are times when using brooms and rakes is no longer feasible when cleaning one’s backyard, front-yard, garage, pathways, outdoor basketball courts, and other facilities.  It is a time-consuming and exhausting task to manually clear up piles of leaves and fine debris out of these places.  Buying backpack blowers are therefore the ultimate solution for this problem.

This model belongs to a class of power tools called leaf blowers.  All backpack blowers are powered by gasoline-run engines and have frames as well as straps that enable you to carry the machine on your back.  The factors that you should remember are the engine displacement which is measured in cubic centimeters (cc for brevity), the air velocity measured in miles per hour (mph), and the maximum or average air volume which is measured in cubic feet per minute (CFM).  The greater these capacities are, the more powerful a backpack blower is.

Makita BBX7600 Commercial Grade 75.6cc 4-Stroke Gas-Powered 195 mph Backpack Blower

Makita BBX7600
Four-Stroke Backpack Blowers

These are the most powerful backpack blowers because most four-stroke engines have large fuel displacement capacities.  They also generate less smoke emissions since they run on unleaded gasoline.  Noise levels are also significantly reduced compared to their two-stroke counterparts.

A good example of a four-stroke backpack blower is the Makita BBX7600.  Its 75.6 cc engine produces a maximum air velocity of 195 mph and has a maximum air volume of 526 CFM.  Weighing only 22 pounds, it can be used continuously up to 80 minutes without refueling due to its 64 oz. fuel tank capacity.

Husqvarna 125BTHusqvarna 125BT 25.4cc 2-Stroke Gas Powered 140 MPH Backpack Blower
Two-Stroke Backpack Blowers

Lightweight and versatile, these machines are the most commonly used of all backpack blowers.  Their engines are less complex than their four-stroke counterparts, thus they are easy to repair.  Cooling and fuel systems are integrated due to the simplicity their structure.  These require a gasoline-oil mixture to prevent overheating the engine during operation.

See also: Hitachi RB24EAP Review

An example of backpack blowers powered by a two-stroke engine is Husqvarna 125BT. Its 25 cc engine delivers a maximum air velocity of 150 mph.  It also has a maximum air volume of 490 CFM.  Using this machine is comfortable because it weighs only 18 pounds.


Growing Green Beans in Your Yard

Want to grow green beans, but don’t have a “green thumb”?. These handy hints will tell you all you need to know to have a vege patch full of green beans in next to no time.

Growing Green Beans

Types of Green Beans. There are actually 2 sorts of green bean plants, bush beans and pole beans. The names pretty much describe the growing pattern of the plant itself, not the bean. Bush beans are self-supporting plants that will grow in height to 2-3 feet, while pole beans are climbing plants and require either a fence, pole, cage, or trellis to climb up. The other main difference is the length and size of the harvest. Bush beans will provide you with beans sooner, but pole beans are more prolific once they come to harvest.

Some avid gardeners will plant both types, ensuring green beans sooner from the bush plant, while waiting for the pole beans to harvest.

Requirements. Regardless of which bean plant you select, the requirements are similar. Green beans do best in full sun, as in 6-8 hours daily. They will grow with less, but your bean crop will be reduced. Beans like a rich well drained soil, with a pH between 6 and 6.8. Since beans have a shallow root system, they do not take kindly to a lot of disturbance of the ground once they have been planted.

When to Plant. Beans are slightly fussy and will not grow when it is either too hot or too cold.  Optimal air temperatures are between 50 and 80 deg F.

Soil temperature is critical for a successful harvest of beans. Bean seeds will germinate at 60 deg F minimum, but prefer the 70-80 deg range. The optimal time to plant the seeds is when the soil has warmed up to 60 deg F, this should coincide with the last spring frost. Those who want to get a head start on Mother Nature can actually plant their seeds indoors 3-4 weeks before the anticipated final frost in paper containers or peat pots that will break down. (This eliminates the need to disturb the roots of the seedlings in transplantation. ) Wait till 1 or 2 weeks after the frost to replant the seedlings.

Those gardeners who do not experience Jack Frost in winter can plant their seedlings earlier, once the soil has reached 60 degrees. In fact, those with really mild winters can actually plant bean seeds in autumn.

It can be a great idea to stagger the planting times of bush beans. Planting seeds every fortnight will mean that you do not end up with a feast or famine situation.

Planting the Seeds. You may have already noticed that we keep talking about been plant seeds. That is because beans do best when grown from seeds. Another important point to consider before planting the seeds is that beans won’t grow well if you plant them where you grew the cabbage, tomatoes, or potatoes last year.

Bush bean seeds can be planted in rows, to a depth of between 1 1/2 and 2 inches, and about 1 -2 inches apart. The rows should be spaced about 2 to 2 1/2 feet apart. Once you have covered the seeds with dirt, water the seeds in well. After 5-10 days your efforts will be rewarded with seedlings coming through.

Once the plants are about 3 inches tall, it will be time to thin them down. First up, remove any that are not thriving or looking as vigorous as their neighbors. Ideally, you will have a row of healthy looking plants that are about 3-4 inches apart.

Plant pole bean seedsPlant pole bean seeds around whatever it is they will be growing up or supported by. Don’t forget that pole bean plants can be up to 8 foot tall, so be sure to select an appropriate size support. The ideal spacing is about 4-6 inches. You can also plant pole bean seeds on mounds, or little hills. Hills can be up to 3 feet tall and should be about 3 feet apart. If you are growing your pole beans in rows, the rows should be spaced about 3 feet apart.

Rotate the crop. Bean plants are susceptible to root rot if they keep getting planted in the same part of the vege patch. Ideally, they should be moved every season. Worst case scenario, is a maximum of 3 years in the one spot.

Space challenged gardeners can plant rosemary, sunflowers, or corn in amongst the pole beans. Bush beans will grow happily alongside strawberries, rosemary, corn, and celery.

Watering. Do not wet the seeds before planting. Do not over-water once you have planted the seeds. The seeds need to be kept moist but not water logged. Once the plants are sprouting you can reduce watering. However, this does not mean that your beans will grow in desert like conditions. Mulching can be an excellent idea to help maintain even moisture levels around the plants.

Bean plants are susceptible to fungus. Obviously you cannot do anything about rain, but when watering the plants aim the hose or watering can at the ground and not at the plants themselves. Having the plants at a good distance apart will also help keep fungal problems down. The beans should not be handled when they are wet.

Fertilizing. Generally, bean plants can grow well with just an initial application of a good quality fertilizer or garden compost when preparing the ground for planting. Beans do not like fertilizers that are rich in nitrogen, in fact this will reduce your haul.

PestsPests. A blast of well aimed water from the hose can remove pests such as mites, leaf-hoppers, and aphids. Alternatively, insect powders compatible with edible produce can be used. The Mexican bean beetle can be plucked off, however if you spy any eggs lurking under a leaf, you should remove the entire leaf.

Picking the Beans. After 45-60 days your bush plants will be giving you beans. You will have to wait a little longer for the pole plants, about 60-85 days. Bush beans will give you beans for about 2-4 weeks, while pole beans can last an entire season.

To avoid fungal diseases, the beans should only be picked when the plant is dry. Beans should not be picked in extreme weathers, neither too cold nor too hot. Do not let the beans stay on the plant for too long as this will not only result in leathery beans, but also decreased bean production.  Frequent picking of the beans will encourage more beans to grow. Take a little care when picking the beans to avoid damaging the plant.

Enjoy!

Backpack Leaf Blowers with Hip-mounted Throttles

Backpack Leaf Blowers with Hip-mounted ThrottlesThe throttles of these backpack leaf blowers are located on the air outlet tube.  Thus, the air speed can be adjusted and at the same time the nozzle can be aimed at the target.  The throttle can be adjusted in accordance to the operator’s arm length.  However, some backpack leaf blower manufacturers configure tube-mounted throttles with a hip-mounted option.

The Echo PB-620ST backpack leaf blower is powered by a 58.2 cc engine that has a maximum air velocity of 185 mph and a maximum air volume of 900 CFM.  The operator can set variable speeds and activate the cruise control function.  Thus, there is no need to constantly adjust the throttle speed.

Echo PB-500H Gas Powered Backpack Blower
Echo PB-500H Gas Powered Leaf Blower

Echo PB-500H Gas Powered Backpack Blower

The throttle is located at the left-hip side of this backpack leaf blower.  This allows the operator to use his left hand in adjusting the engine speed and his right hand to point the blower’s nozzle to his target.  Therefore, right-hand fatigue is eliminated when using this backpack leaf blower.

The Echo PB-500H backpack leaf blower has a hip-mounted throttle.  It has a maximum air velocity of 162 mph and an average air volume of 450 CFM generated by its 50.8 cc engine.  Its cruise control function allows the user to set various air speeds for certain periods of time and the machine automatically runs at the same velocity.


Hydroponics Gardening

Indoor gardening is a popular pastime done by hundreds of thousands of people. Using hydroponics equipment, you can grow flowers, houseplants, vegetables, fruits, and herbs. In fact, many people are so fond of this type of growing that fresh foods on the dinner table are those grown within the home. Who enjoys indoor gardening? The answer is anyone, although people with limited yard space or those living in apartments generally enjoy the most benefit. This type of growing is not just fun but also very rewarding, allowing you to harvest foods and specialty plants all year round.

Indoor garden

If you want to get started with indoor Hydroponics gardening, you first need to choose the location where your garden will grow, an important consideration. Since hydroponics produce heat, it is important you have good airflow so the plants themselves remain cool. In addition, fresh air helps provide more of the carbon dioxide that plants need for photosynthesis. If possible, we recommend you use a room with a window. Although you could use a cool basement, a common problem is poor ventilation, which can actually counteract the heat from the electric lights.

Next for your indoor gardening project, you want to consider the number and size of the plants you will use. In most cases, plants growing indoors need just as much space to grow as they would outside. Keep in mind that specific demands vary from plant to plant so try to choose plants that will work best together while still meeting your personal needs. Additionally, plants may need a little more space indoors since electric light cannot penetrate through leaves the same way as sunlight would. Another thing to keep in mind is the ease of movement in caring for the plants. In other words, you want to organize the space so you can maintain your indoor garden with ease.Indoor garden ideas

Growing plants indoors also comes with a consideration for vertical space. With this, you need to think about the mature height of the plant, which would also include space requirements for the hydroponics lights, as well as the ceiling. Then, be sure you add in the height for your planter, making sure your plants will have adequate room to grow tall and healthy. After taking the location and plant options into consideration, you need to turn your attention to the actual equipment needed for an indoor garden. As you begin shopping around, chances are you will be surprised by the wide array of choices but the right choice will depend on the type of plants chosen and the location.

ARE ORGANIC GARDENS PRODUCTIVE?

are-organic-gardens-productive
Organic gardens

Most definitely, as you will soon discover. The great thing about organic gardens is their versatility. You could start a garden to sell vegetables at your local farmer’s market, joint a co-op, or simply use the food for your family and gift-making projects.

Organic gardens can be quite large, grown in raised gardens that measure 12×12-foot or whatever size you like, or in a small container. This means the level of productivity is dependant on how much you want to grow, how much space you have, and the amount of time you an dedicate. To give you an idea of some of the vegetables that you might consider growing, look at this list of popular choices.

Without doubt, organic gardening is the best, most efficient, and healthiest way to grow plants and vegetables. Regardless of the size of garden, growing organically is something the entire family can do together as a project. As you will see from the information below, there are many different reasons for starting your own organic garden, each extremely beneficial.

WHAT IS AN ORGANIC GARDEN

From a high-level view, organic gardening is a simple way to grow fresh fruits, vegetables, herbs, and flowers in an all-natural environment. This means that nothing is treated with pesticides or herbicides and that everything grown is clean, natural, and healthy. With organic gardening, not only is the entire family eating healthier but the environment is also saved from harmful chemicals.

Concept

If you have never grown vegetation this way before, it is easy to do and makes a great family project. With organic gardening, two basic components exist. The first is creating soil that is natural and rich in nutrients and the second is managing diseases, pests, and weeds, using only natural controls.

Keep in mind that when it comes to this natural type of gardening, various methods could be used. However, the method you choose will depend on the type of soil and the type of plants you choose to grow.

Being successful at organic gardening does require dedication but you can be sure the first time you taste your homegrown foods or create a colorful bouquet, you will be convinced that the efforts are well worth it. Fruits and vegetables will actually taste better and herbs and flowers will grow strong and healthy.

Soil and Mulch

The overall concept is that you need to build your soil up to a level of having balanced pH, whether neutral, alkaline, or acidic, before the nutrients are added. What happens is that when the soil’s pH levels are off, you will constantly be battling with different plants that are not growing well.

By working with living soil, you will produce pesticide and herbicide-free fruit, vegetables, herbs, and plants, giving them a safe environment to grow. Once you get your organic garden going, you will be able to use any number of natural methods for controlling both pests and diseases. One of the most important things you will need to do is educate yourself on the types of pests found in a garden.

The reason this is crucial, especially for an organic garden is that many of the pests you will see are good for the garden and therefore, should not be destroyed. Another important factor of organic gardening is mulch, which will be used for a number of purposes to include:

Regulating soil moisture
Regulating soil temperature
Add nutrients to the soil
Controlling weeds

Planting Flowers

Planting FlowersEach geographic area has its own planting time. Predicting when to plant your flowers is a tough task when weather is so unpredictable. The wait can be rough, but here are some tips on how to know when to plant, where to plant and how to take care of your flowers once they are planted.

The majority of annuals are not tolerant to frost and all transplants do better when the soil has had some time to get warm after a long, cold winter. Perennials are not so picky. Many Perennials can even be planted in the fall, especially if they are bulbs. Annuals and perennials are often shipped from areas that are warm or have been force into growing early inside a nursery or greenhouse. Frost must be totally gone for these plants or you will loose them.
Well drained soil is a must for most plants. Raised or contained flower beds can be constructed so that there is adequate drainage by mixing the soil that is already there with compost and sand. This will help keep the soil loose and draining in such a manner that your plants will be ecstatic. Adding compost to the soil also provides the nutrients young plants need when first starting out.

SHRUBS
Shrubs, also known as bushes fall in the horticultural category instead of just the botanical category, such as a woody plant like that of a tree. However, while there are similarities, shrubs are lower to the ground with multiple stems. Keep in mind that smaller and lower shrubs to include periwinkle, thyme, and lavender are often referred to as sub-shrubs. Regardless, unlike a tree, shrubs are distinguished by the multiple branches that come from close to the ground, as well as reaching a mature height of 12 feet of less.

Plating shrubs in Spring
Shrubs are a wonderful way to enhance the appearance of your home. You can use flowering shrubs underneath windows in the front of the house to balance out the appearance while also providing beautiful color. If you have a side of the home where grass or other types of plants are difficult to grow, then perhaps one or two shrubs would be the perfect solution to spruce things up. You can also use shrubs as borders around decks, outdoor gardens, or even to provide privacy between neighbors or help reduce traffic noise. The challenge comes in trying to choose since you have so many incredible options, which you are about to discover.

Although you will need to learn about proper care specific to the type of shrub you buy, most are cared for much the same as trees.

Pruning
Prune large, overgrown shrubs during fall and winter. Thinning ( rather than shearing them at the top) will reduce the plant’s size without affecting its overall shape.